Wednesday, August 14, 2013

Back to School Scavenger Hunt

We have done this "Back to School Scavenger Hunt" for the past two years. Each year my kids get so excited and ask "Are we going to do the scavenger hunt again"? It's always the same hunt and for the same supplies but they love it. 

The night before school starts I make them their favorite dinner and then the scavenger hunt begins. It's all supplies to fill their backpacks =)

One of my favorite blogs, Happy Home Fairy is where all of these adorable printouts for the scavenger hunt came from!  Click HERE to print out your own.
Your kids will love it!

My favorite part is the message at the end....

Check out her website for tons of wonderful ideas and printouts!


Friday, August 9, 2013

Prep 2- For Back to School


I am continuing on with my "Prep" for Back to School Posts. Like I have mentioned before our lives here at the Bradshaw Household get really busy with back to school, homework, AWANAs, Soccer and the list goes on. So I'm sharing with you some of my favorite ways to simplify and still fill my family's tummies with a good home cooked and healthy meal.

When it comes to Freezer cooking, it often times can get overwhelming for people. With all these different recipes, hours and hours in the Kitchen- and if that works for you that's wonderful! But most times I only have 30 minutes or an hour tops. 

So here's what I do, instead of focusing on a bunch of different Freezer meals I work off of the same recipe and make 3-4 batches of it. This way it will get me through the month with a once a week meal. 
Let's get started, shall we?

Prep 2: Freezer Fajitas
During the school year, Monday nights usually are Fajita nights at our house. It's one of our favorite meals and happens just about every Monday! This is a super easy "dump" recipe. "Dump Recipes" are recipes where you literally just dump the ingredients in a Freezer Ziplock baggie. It is so easy to stock your freezer with a months worth of Monday Night Fajita Bags.


Freezer Fajita mix
Shopping List:
--2 lbs of thin cut stir fry beef, chicken or shrimp
--1 packet of fajita seasoning mix 
--1 onion 
--2 bell peppers (any color)
--1/2 cup of water

Slice the onion and bell peppers lengthwise into strips.  Mix the Fajita Seasoning Packet and water together. Dump all of the above items, including the Fajita Seasoning and water in a Large Freezer Zip-Lock Baggie. Label your bag.

Directions:
Set the Bag in the fridge on a plate or cookie sheet to thaw, the night before. If you didn’t have a chance to thaw that’s ok. Run the large Ziplock baggie under cold water for about 30 seconds so everything will release from the bag. Dump the frozen Fajita Mixture into a hot pan with a little oil (so everything can get a nice grill like mark).  Over Medium Heat put the lid on the pan and let cook. Stir often. Once everything is just about cooked I like to dump out as much liquid as I can. This way the beef/chicken and veges can get a little brown and yummy. Cook til done.

Warm up some Tortillas. Serve the Fajitas with any extra toppings you like (salsa, sour cream, avocados) or leave as is. Many times we just eat the fajitas served with chips and salsa. DELICIOUS!

***And remember you can also freeze Tortillas. We do this all the time and they come out perfect! Set out the tortillas the night before in the fridge and let thaw.

I hope you enjoy!


Wednesday, August 7, 2013

Back to School Countdown... Prep 1

The Countdown is on till School resumes again. So that means for me that I need to getting planning and prepping to help save me time and money on those busy days and nights of School, Soccer and AWANA's, just to name a few. 

Today I will be focusing on Prep 1, which will be all about saving time, money and your sanity when it comes to Kids' Lunches. The next few days leading into next week I will be focusing on different stages of prep that will hopefully get us all set for Back to School!

Prep 1... Freezer PB&Js

 The Ultimate, time saver during school time: 
Stock your Freezer with your kids' Peanut butter & Jelly sandwiches, or honey and Peanut Butter sandwiches. You will thank me later!

Whether you kids are school aged kids or pre-school kids. This takes VERY LITTLE time to do and helps not only keep your sanity sometimes but keeps your kitchen clean and they are so easy to grab when you are running out the door to run some errands, soccer practice, etc! Plus it's going  to SAVE you MONEY! Instead of running out the door and going through McDonald's drive Thru to pick up a snack or meal.

Some of you might already do this...the rest of you are going to think this is the absolute smartest thing EVER! That's how I was too...Why didn't I think of this years ago?!?!
Oh well that's what this blog is all about! Building a community to share these ideas!

  • If you are planning a Grocery trip (depending on how many kids you have and how much freezer space you have) I typically buy atleast 3-4 loaves of bread when I want to stock up.But use what you have! If you have a loaf in the pantry then just start there.
  • Prep Sandwiches like normal and bag individually
  • Once all bagged I add them in a large freezer baggie.
TO THAW:  1.) If you are packing your kids lunch, the morning of... just put the frozen sandwich baggie in their lunch box. It will be all ready by the time school starts. In fact they thaw so fast... 2.) if you are at home just grab a sandwich out of the freezer and set the bagged sandwich on your counter it will be ready in no time! 3.) Or on your way out the door grab a few for the little ones at soccer practice and they will be ready to go!
Then you are DONE!


This simple step is a huge Mommy Saver!

Tuesday, July 30, 2013

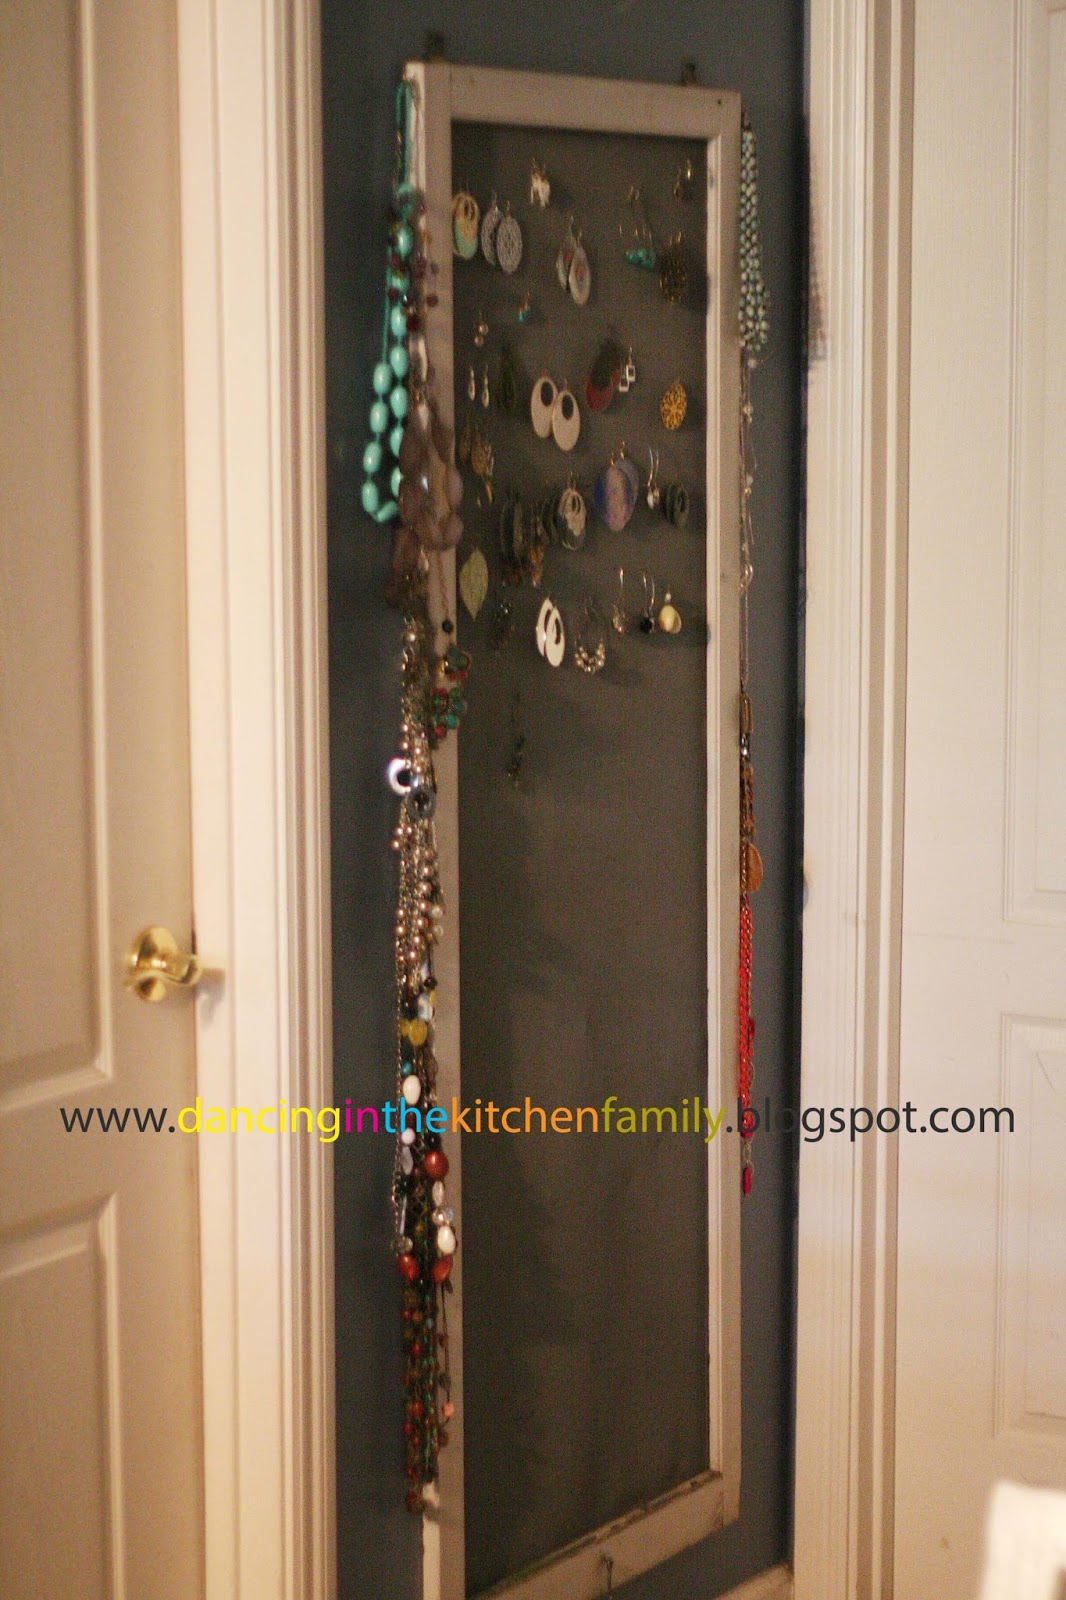
My Favorite Way to Use an Old Screen

This is one of my "Favorite" items in our home, that happens to be in our bedroom. As I've probably mentioned many times...I Love taking old-vintage pieces and using them in a new way. I am just intrigued about imagining the history behind the items and the stories they tell.

So here we go... My Favorite Way to use an Old Screen:

I found this old vintage screen at an Antique store down town on sale for $8.00, regularly $10.00.


I took it home scrub it with my handy dandy scrubber brush and some cleaner.


Added some little hooks that I just screwed in on the side.


Hung it up and DONE!


This makes the perfect jewelry holder. My necklaces easily hang on the side with multiple hooks, and my earrings just hang perfectly. This addition to our bedroom 2 years ago is still one of my favorite additions. 

I hope you enjoy too!


Saturday, July 27, 2013

Freezer Time Savers: Garlic Bread and Peach Crisp


Life is BUSY! Kids, schedules, sports, the list goes on... So I am all about doing quick and easy prep that will help my life be a little bit easier.

So I'm going to share with you some of my favorite Quick and Easy Tips that I do to make life easier when it comes to dinner time.

First up... Garlic Bread!

 Did you know that the .99 cent Store off of Olive Drive (Next to Big Lots) carries Pyrenees Bread? Yep! So swing by, head to the very back of the store and pick up some loaves! If you have an outside freezer I would grab like 5 loaves. If you just have your traditional side freezer-fridge then maybe just grab 1 for now.  
This is also where I buy alot of my disposable containers for my other freezer meals! Many times I can get 3 disposable containers for $1.00! Stock up, trust me it makes life a little easier!

YOU WILL NEED: 
  • Freezer Bags
  • Foil
  • Butter
  • Favorite Seasoning (I usually just use Garlic Salt) 
  • I also like to add some Parmesan Cheese (totally optional- just use what you have)

Ok let's get started! It's pretty plain and simple and I'm sure you don't really need me to walk you through...but just in case...here you go.

  1.  Slice your bread in the portions that your family will eat. So for my little Family of 4 (2 small kids) I cut the loaves in thirds.


2.    Lather both sides in butter, seasoning & parmesan Cheese.

3. Wrap them in individually in foil and put as many foil wrapped loaves in a large ziplock baggie as you can and label. DONE!


Now when you need to throw together a quick dinner. Maybe some canned Soup (that you've been cooking over the stove ALL day)  ;) and a Salad just heat up your oven to about 350. Grab your loaf out of the freezer, still completely wrapped in foil. Put the foil wrapped loaf on the rack of the oven and let heat up for about 15-20 min. You can also at that time, peel the foil back so it makes a little foil bed for your bread and turn your broiler on high for about 3-4 min.

Delicious and Quick!

 Next up... a Quick and Super Easy Dessert!

Again, as I've mentioned before in this blog. If you are looking for elegant, all day recipes this probably isn't the place. I am a super busy Mom and Wife like you all and I don't need 5 star restaurants meals. I need quick meals that fill my family's tummies! 
So when I was picking up Pyrenees bread at the .99 cent Store (different than the dollar tree).  I saw that they had Betty Crocker Oatmeal Mix. So I grabbed the bag and looked on back ( Since I'm the only one who would eat oatmeal cookies I thought I better check out on the back to see if there are some other ideas that my family might like) 

And what do you know... Peach Crisp! PERRRRFECT! So I grabbed a couple of bags. 

Then picked up the pie tins- 3 for .99 cents.

I knew my next stop was going to be Smart & Final so I picked up one of their HUGE containers of sliced peaches for about $4.00 along with my other groceries and I was all set to assemble!


  1.  First off I drained my peaches of most of the liquid. I kept a little in there. 
  2. Dispersed them into as many pie pans as I could. 
  3. Then I followed the directions on the back of my Betty Crocker cookie mix bag. It was so simple- in a bowl I poured the cookie mix in. Cut in 1/2 Cup of cold butter.
  4. I did add a little bit of cinnamon and sugar to the top of my peaches and then topped it with the Oatmeal mix.
  5. Wrapped them in foil. And the best part these pie tins fit perfectly in my Freezer zip lock baggies! Label and I'm all set! Perfect dessert for unexpected guests. Or just when my family wants something sweet.
  6. When you are ready to eat. Take it out of the ziplock baggie. If you are prepared ahead of time you can let it sit overnight in your fridge to thaw. But if not. Then just put the Peach Crisp (Still wrapped in foil) in a preheated 400 degree oven for about 25-30 min. ( I always line a cookie sheet with foil so I don't have a mess in my oven- just in case I filled one too full) Then take the foil off. See how it's doing, and put it back in the oven uncovered until it's all bubbly and yummy.
The most important part...(in my book)... when you are dishing out the Peach Crisp- while it's hot add a big scoop of Vanilla Ice Cream. 

It's cheap, easy, yummy and a perfect dessert to bring with a meal for someone who just got out of the hospital. Or maybe for that friend who just got off work after a long day. Send her a quick message and say "I'm bringing your family dinner and dessert tonight. Just because."

What a blessing that would be to someone!

Enjoy Friends!

Friday, July 26, 2013

Goodwill Finds

Going into the Goodwill you have to have an open mind of possibilities... 
Here's what I came up with the last trip I made to the GW. 

Wood Box for $3.99...converted into a personalized Planter box for my porch.

Using left over paint and some greenery that I had this project was a great and cheap addition!


Here's what else I scored at the Goodwill that Day:


Tuesday, July 23, 2013

Freezing Herbs & Saving Thyme (I crack myself up)

Anything that will save me time, and also help me from dirtying my kitchen more than necessary I love! This isn't some new fancy method, I'm sure you've seen it all over the Pinterest boards. But it's something simple, easy and useful for my family so I thought you might enjoy as well.

We have a little container garden in our backyard that includes: Rosemary, Basil, Oregano, Thyme, Peppermint, Orange Mint, Parsley and Cilantro. I just absolutely LOVE having fresh herbs when I cook, and I think that is why I love this simple method so much.

So here you go- this is what I do to save me some time!


Once frozen, put them in a ziplock baggies and you are set!


When you are ready to sauté up some veges or cook some chicken you can cut a few steps out of the prep work!


Freeze your Mint too! HOWEVER instead of adding Olive Oil, you add the WATER! =) 


Perfect addition to your ice water or tea!