

We are going to ease into some freezer meals.
Instead of overwhelming you with a bunch of recipes to make. We are going to focus on 3 recipes!
- Freezer Fajitas- Monday nights are Fajita nights at our house. It's one of our favorite meals and happens just about every Monday! This is a super easy "dump" recipe. "Dump Recipes" are recipes where you literally just dump the ingredients in a Freezer Ziplock baggie. It is so easy to stock your freezer with a months worth of Monday Night Fajita Bags.
- Fruit and Yogurt Smoothie Packets- I used to have a bad habit of not eating breakfast... Thankfully I've gotten better, and these Fruit and Yogurt packets not only help get me going in the morning but are packed full of goodness!
- Waffles for the freezer- Perfect for those busy school day mornings with kids. There is no fancy recipe here. When you get to the store just purchase your favorite Waffle mix and plenty of eggs. Later I will share with you a pancake mix that takes very little time and money to make. Plus it makes your house smell A-MAZING!
Just to remind you, at the bottom of this post is a "Print Friendly Button". To save on ink you can highlight over certain sections to remove any unwanted text. You can print, save and email this information.
So let's get started!
So let's get started!
Freezer Waffles/Pancakes
Shopping List:
- 1 Box of your favorite Waffle mix
- Plenty of Eggs (depending on how many batches you are going to make)
- Large Freezer Baggies
- Follow the recipe on the box and double or triple the recipe to get the number of waffles you want to make.
- After you have made a few waffles you will want to “Flash Freeze” them. If you don’t flash freeze then you will have a bag full of Waffle mush.
- To Flash Freeze- Grab a cookie sheet and set a few waffles on it, unwrapped. Put it in your freezer for a short period of time, 20 minutes or so. You want the waffles to harden just a little bit. Flash freeze waffles as you are working on your next batch. After about 20 minutes, take the waffles out of the freezer and place in a Freezer bag. Once bag is full put the waffles in the freezer.
- When you are ready to eat, grab them out of the freezer. I just throw them in my cast iron skillet to heat up because my kids like them to get a little crunchy. But I'm sure you could wrap them in a paper towel and microwave them for about 30 seconds or so. Or even in your toaster oven.
You can leave waffles as is or cut in strips like the "Cook Like A Diva" did.
They also have a great "Healthy Homemade Waffle Mix" if you would like to make your own.
Click HERE to visit their site and check out all their other great recipes


(Photo Credits: Cook Like a Diva)
Next Up...
Fruit and Yogurt Smoothie Packets
Shopping List:
- 1 Container of Yogurt (greek yogurt has more protein but does usually cost more)
- Bag of Frozen or fresh Fruit
- Spinach (I buy a Big Bag of Spinach from Costco for around $3.00- perfect to add to your smoothies. Spinach is filled with nutrients and has very little affect on the taste.)
- Sandwich Baggies
- Ice Cube trays (4 for .99 at the Dollar Tree)
- Large Freezer Bags
1. Add yogurt to Ice Cube Trays. To make it easy to get yogurt cubes out try not to let spill over when you are spooning the yogurt into each cube tray. Freeze.
2. When Yogurt is frozen assemble: Each baggie should have 3
Yogurt Cubes and about 1 1/2 Cups of Fruit.
3. Once you’ve assembled all your baggies put all the Smoothie
Packets in 1 Large Freezer Bag
4. When you are ready to make a smoothie in the mornings just
grab one small bag out of your freezer. Put the fruit and yogurt cubes into your blender, add milk or juice until it reaches a smooth consistency. (You can also add your washed spinach, protein powder, etc)
5. Other options that can be added when you are ready to make
your smoothie-honey, cinnamon or peanut butter.
Check out "The Tidy Nest"
for more on these "Make-Ahead Freezer Smoothies" and other great ideas.

(Photo Credit: The Tidy Nest)

Last on the list...
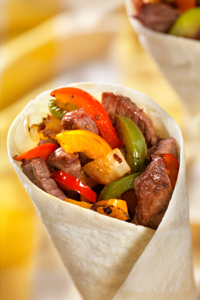
Freezer Fajita mix
Shopping List:
--2 lbs of thin cut stir fry beef or chicken
--1 packet of fajita seasoning mix
--1 onion
--2 bell peppers (any color)
--1 bag of frozen onions or dice your own
--1/2 cup of water
Mix the Fajita Seasoning Packet and water together. Dump all of the above items in a Large Freezer Zip-Lock Baggie. Add the Fajita mix and water.
Directions:
Set the Bag in the fridge on a plate or cookie sheet to thaw, the night before. If you didn’t have a chance to thaw that’s ok. Run the large Ziplock baggie under cold water for about 30 seconds so everything will release from the bag. Dump the frozen Fajita Mixture into pan. Over Medium Heat put the lid on the pan and let cook. Stir often. Once everything is just about cooked I like to dump out as much liquid as I can. This way the beef/chicken and veges can get brown and yummy. Cook til done.
Warm up some Tortillas. Serve the Fajitas with any extra toppings you like (salsa, sour cream, avocados) or leave as is. Many times we just eat the fajitas served with chips and salsa. DELICIOUS!
Warm up some Tortillas. Serve the Fajitas with any extra toppings you like (salsa, sour cream, avocados) or leave as is. Many times we just eat the fajitas served with chips and salsa. DELICIOUS!
Too often when I've tried the crockpot version the meat gets over cooked.
But maybe you will have better luck! For those long and busy days of work, kids soccer practice and errands...the Fajitas in the crockpot would be perfect to come home to.
Click HERE to visit her page with more info.
(Photo Credit: Mama and Baby Love)
I hope this helps get you started! These freezer meals not only save you money but time and that's a great thing!
Enjoy!


No comments:
Post a Comment